

20 Aug How to photograph like Michael Kenna – Tutorial
How to photograph like Michael Kenna
Learn from the Masters
Some days we look at well-known photographers images and something in us just cries out “I wish I could create images like that”! At first I thought it was just me but I have discovered that the majority of photographers feel like this about certain other photographers some time. If you have ever seen the beautiful black and white zen-like work of Michael Kenna then you will probably know this feeling really well. If you don’t know Michael Kenna’s work, have a look at his web site. Once you have finished weeping with inadequacy come back and let us look at how to photograph like Michael Kenna so you too can create similar style images.
Have a look at our other ‘How to photograph like…’ series that includes Edward Weston and Ansel Adams to see how to create images like they have.
Now before we get started there are a few things to know.
- Michael Kenna creates images on a medium format Hasselblad.
- He uses film
- He has a very zen-like nature about him
- He is a photographic genius
- He is a darkroom super-craftsman
So now the bar has been set so spectacularly high, let’s see what we can do with our DSLR or Mirrorless digital cameras – no pressure then!
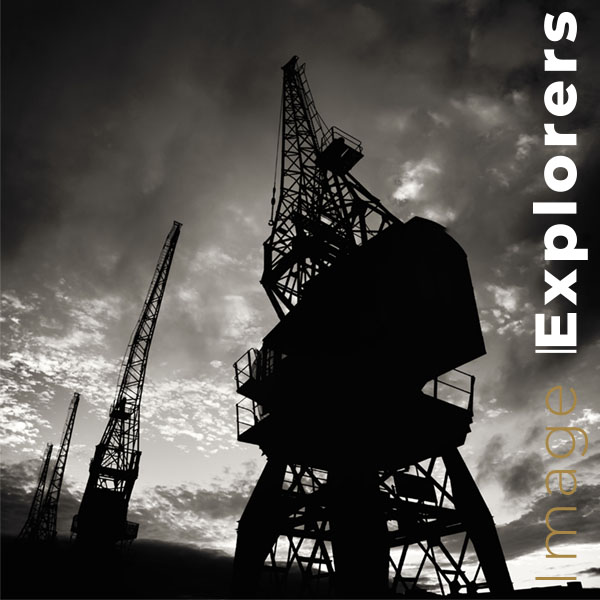
I photographed these cranes at the Bristol harbour, UK in a Kenna style with simple shape and no shadow detail
Analysing the Master
When trying to imitate anybody’s style we start by analysing their techniques, so when looking at Michael Kenna’s photography, this is what I saw.
Composition:
Michael Kenna looks for simplicity in his composition, moving closer or framing the subjects to get rid of extraneous objects. He uses a lot of symmetry and rule of thirds but is not afraid to break rules if the composition calls for it. As he photographs on a Hasselblad which has a square format, a vast number of his images are square.
- Pro tip – Michael will often put the horizon on almost the centre of the image. He uses a technique called the optical centre. This is about 10% above the centre of an image and is where the eye naturally rests.
The images have a timeless quality about them, which suggests a photographer who is in no rush, and analyses every scene and possible angle before creating the image.
Black and White film:
In an interview with Procameraman.jp Michael talked about his favourite film as Kodak Tri-X 400 ISO. This is a very forgiving / flexible film and well suited to the long exposures he does. Some are as long as 10 hours. It also has a very distinctive and pronounced grain structure. See our post on what black and white film to choose to find out more.
ND to blur clouds or water and other filters to darken skies:
In order to create the long exposures, to get the milky water during daytime we need to assume that Michael uses an Neutral Density filter and the camera on a tripod. See our how to photograph with ND filters tutorial.
We can also assume he uses a red and or polarizing filter to darken and lighten parts of the image. We have written extensively about using filters in black and white photography in other posts.
Quite a lot of contrast and high key:
Michael Kenna’s images appear to have large tracts of almost black and almost white in them. The middle tones are there but are in the minority. A lot of his images are also high-key, meaning most of the image is really light although almost every image has something nearly black in it. As a master craftsman Kenna is probably using a combination of film development chemistry and darkroom techniques to augment the original stark image. For more ideas about black and white, see our post on what makes a good black and white image.
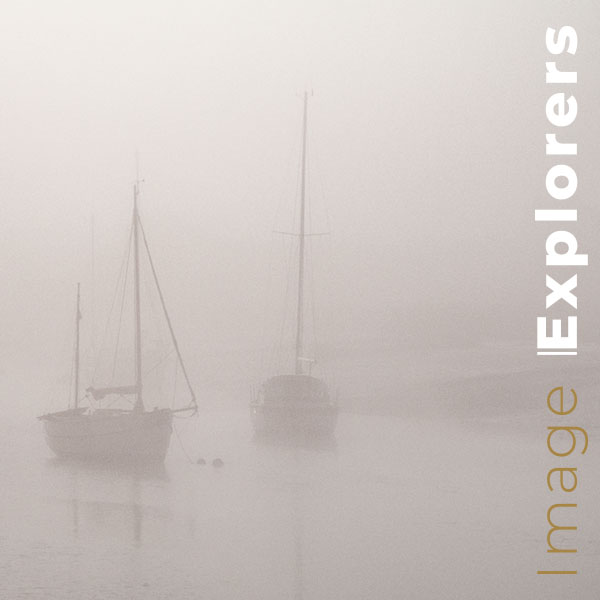
I photographed this high key image in Wivenhoe near our home on a misty autumn morning. Not quite Kenna style as it doesn’t have any very dark areas.
How to Photograph like Michael Kenna Step-by-Step guide
Find your Perfect Composition
This is the hardest part of the process but with a little patience you will achieve extraordinary results. Don’t rush things. Leave your camera in your bag until you have found the perfect spot to create an image from. Try to pre-visualise the final image before you touch the camera.
Look around for simple details, structures or shapes. To photograph like Michael Kenna, try to ignore the colour aspect that can be overwhelming.
To help us compose we set the Sony A7R camera to black and white mode so the images appear in the viewfinder as black and white (most mirrorless cameras have a similar feature).
If we’re using Ally’s Nikon D600 DSLR or a film camera that doesn’t have this feature then we view the scene through a strong coloured filter. This gives you one colour, and even though it’s not black and white, it helps to show the shape and form of the scene.
Exposing the Scene
To photograph like Michael Kenna, use long exposures with the camera on a tripod to get movement in clouds and water. Make sure you’re using a solid tripod, as even the slightest movement on the camera during a 30-second exposure can ruin an image. Use a Neutral Density filter to help you get the very long shutter times you need. Our 10-stop filter usually allows us to achieve 30-second shutter times in normal daylight.
We use Manfrotto and Gitzo heavy duty tripods with robust heads. They are a pain to carry but so worth it when you images are stunning. We recently tried out a travel tripod from Manfrotto but it was much to wobbly in even the slightest breeze so it’s going on eBay soon. Don’t forget your red or orange or polarising filter to darken the sky. These will also help to give you longer shutter times.
Not all of Michael Kenna’s photographs are long exposures though but they are all about simplicity. Taking the essence on the scene into a beautiful composition. Michael once referred to his images as a Haiku rather than a literary work.
The Digital Darkroom
Michael is known as a darkroom master artist and artisan and so it comes as no surprise that he does a lot of dodging and burning on his images. He also mentioned in an interview with Camerawork magazine that he uses Ilford Multigrade paper so he can dodge or burn areas at a variety of contrasts.
All of this we can do in our RAW files using adjustment brushes.
Finally, a how to photograph like Michael Kenna post would not be complete without talking about toning. Michael uses sepia tone on his images to give the highlights a bit of colour. We can easily do this to our RAW files in the RAW converter or, (and we prefer this method), use a Gradient Map adjustment layer in Photoshop.


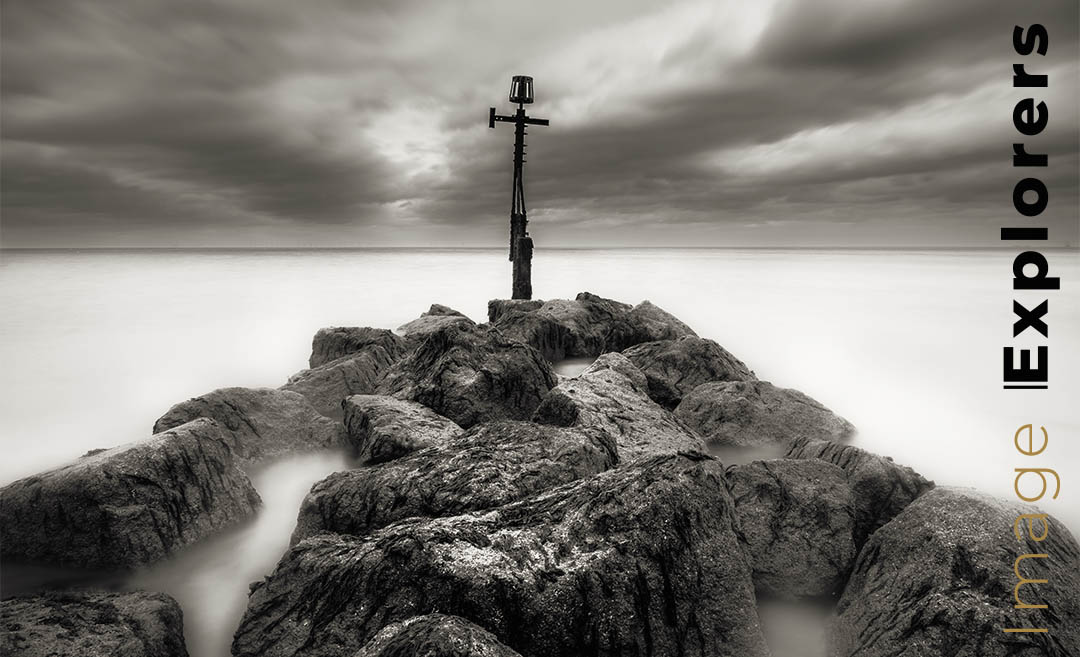
Final and original image from our Michael Kenna style photographic trip. Drag slider to see more.
Putting it all into practice with a trip to the North Norfolk coast in the United Kingdom
The Photographic Process
Ally and I live in a county called Essex, which is about an hour’s drive from central London (or 2 if the traffic’s bad). About 2 hours drive north of us, is the beautiful undeveloped coastline of Norfolk that offers plenty of scope for interesting images. After a long hot summer we set off for 2 days photography knowing that we wanted to create something simple and stark.
The first day was stunning, bright blue sky with small puffy clouds, long sandy beaches with sand dunes, photography heaven. The second day was rainy and overcast and just awful. So how did we do? Well, the first days’ images were ‘pants’. (This is an English expression meaning rubbish!)
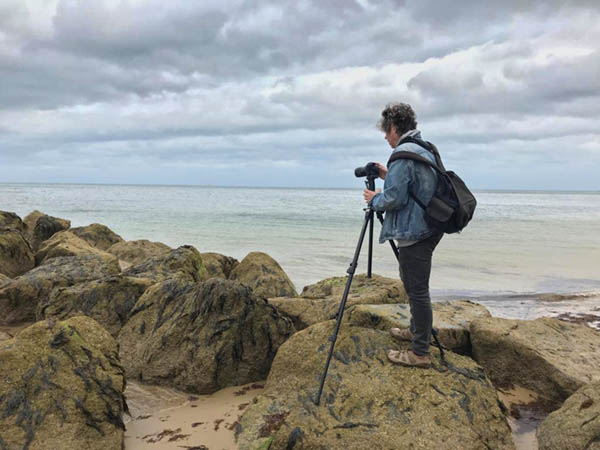
Tim looking for the perfect composition on the rocky pier
It was the overcast sky that gave us the beautiful stark and simple images (without harsh shadows) that we were looking for. I find this very annoying as I (Tim) am a sun worshiper and hate overcast days but there we go.
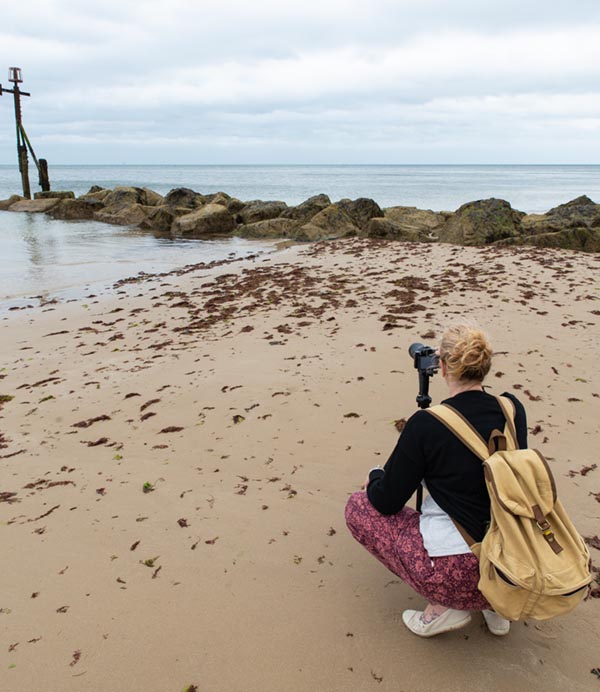
Ally trying a different angle
Once I had viewed all the potential photographic vantage points for the pier I wanted to photograph, I set up the Manfrotto tripod on the rocks and made sure it was secure. I wanted to do some longer (30 sec) exposures to give the water movement so I attached our ND filter. The exposures ranged from 10 to 30 seconds and even though I had a sturdy tripod the wind still gave me a bit of camera shake on some of them.
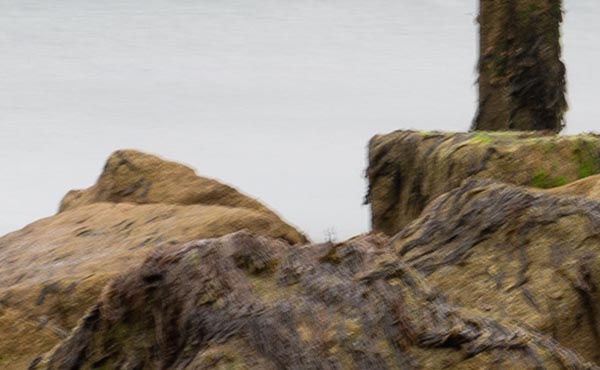
This is what the bit of wind did to my long exposure when it buffeted the camera
When composing I used a combination of symmetry and the rule of thirds for my horizon.
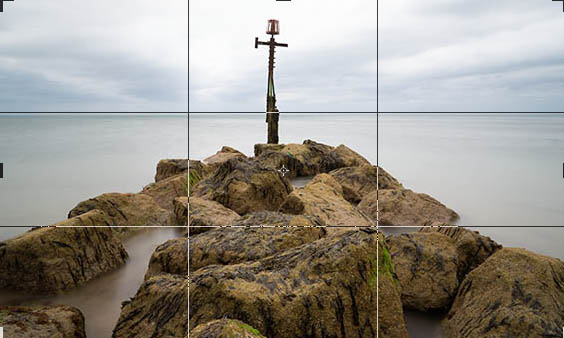
Rule of Thirds
In the Digital Darkroom
I am using Adobe Photoshop Creative Cloud (2018) however this technique will be very similar in any software that enables RAW file editing including Affinity Photo, a favourite of ours on the iPad.
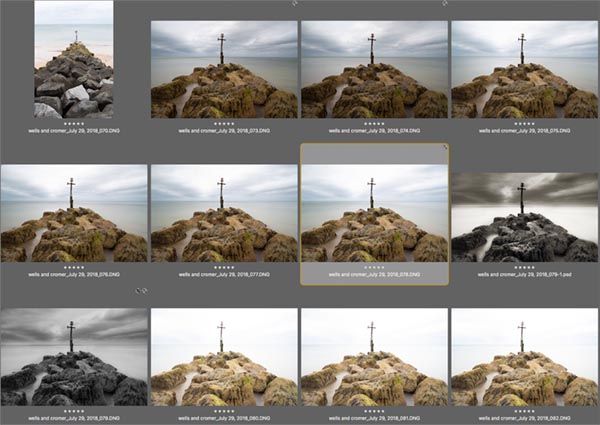
Cromer contact sheet in Bridge including some edits
In Raw, the un-retouched original
In Raw with very basic edit
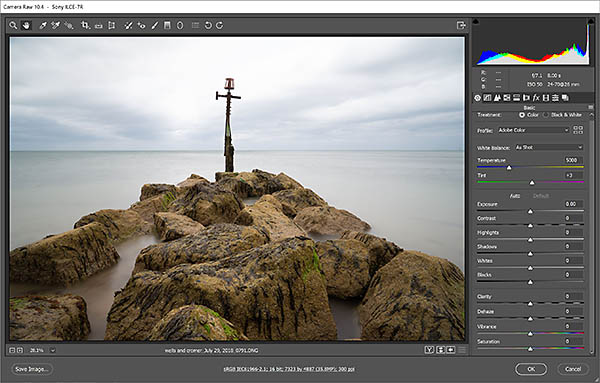
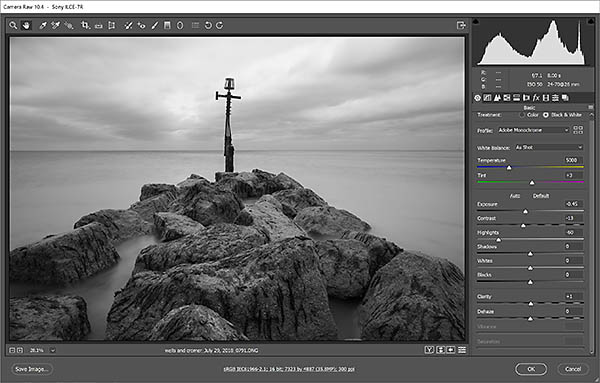
The first thing I did when opening the image in Raw was to convert it to Black and White. I also set the options to sRGB (not greyscale) and the channel bit depth to 16.
This gives me an image with smooth gradients that I can add colour to in Photoshop. If you open it from Raw into Photoshop in greyscale mode you will have to convert it to RGB colour to add the toning adjustment layer. Having it as 16 bit rather than the default 8 means that there are thousands of shades of lightness per channel rather than just 256. This gives you smoother gradients without as much ‘banding’.
I then took down the highlights as some of the clouds were overexposed.
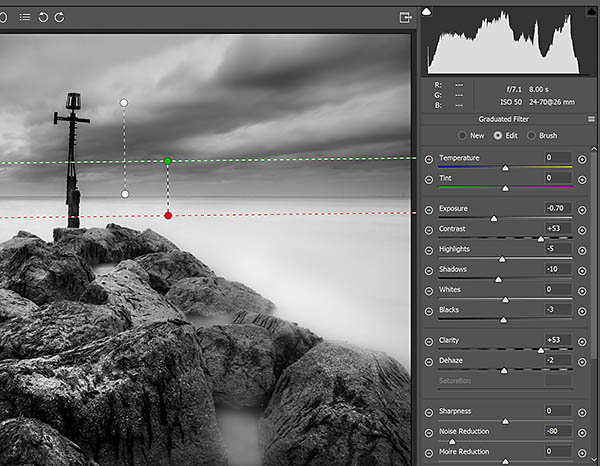
Raw gradient to get the dark sky Michael Kenna style
Along the top of the camera Raw window you will see a little gradient icon. I clicked the icon to get to the gradient area and added 2 gradients to darken down the clouds a bit.
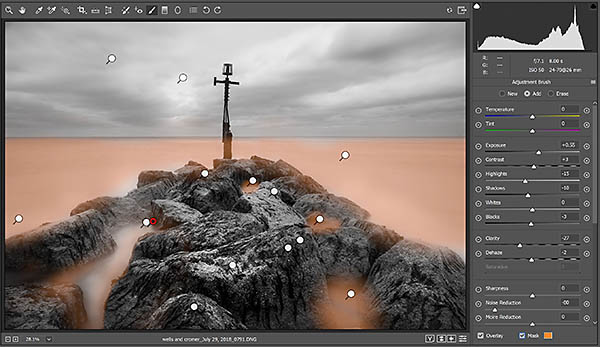
Raw dodge and burn edit like Michael does in the darkroom
Clicking the little paintbrush along the top again, takes you to the adjustment brush area. I added a brush, painted the area I wished to adjust and then adjusted the settings on the right. Not only can you lighten and darken but also change contrast, sharpening, clarity and a host of other properties. As you can see by the dots on the picture I did 13 different brushes. Some to lighten the water, some to increase contrast and detail on the rocks. The little mask button at the bottom allows you to see the areas you are painting. I switch it on and off to see what I’m doing.
Overall on the image I lightened the highlights and darkened the shadows to get that distinct Michael Kenna look.
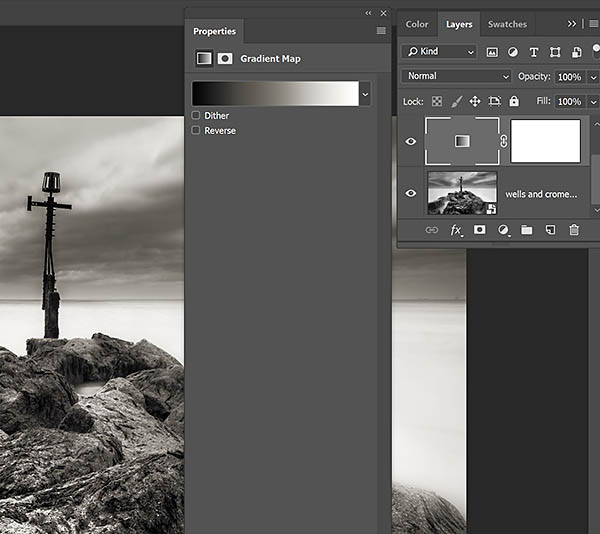
Lastly I added a selenium tone adjustment layer
I opened the image in Photoshop as a Raw smart object. You do this by holding down the Shift key while clicking the open image (object) button in Photoshop Raw.
If you wish to learn Photoshop on the iPad or Affinity Photo on the iPad have a look at our Udemy courses below.

Having my image in Photoshop as a Raw smart object allows me to double click the smart object any time and go back into Camera Raw to make adjustments. If you’ve never converted to black and white before, check out our post with technical and geeky explanations!
I added a Gradient map and chose the Selenium tone Gradient Map. Even though Michael Kenna uses sepia tone over selenium I thought it looked better on this particular image. The difference is that a sepia tone works on the highlights first and selenium toning works on the shadows first.
Final Image
Go Forth and Create Like a Master
As you can probably tell by the tone of this post, Michael Kenna is one of my favourite photographers and although I don’t go out to copy his work, it has always had a great impact on my personal style. Anybody can copy anybody else’s technique; however you need your own personal vision to really create you own image of he world. Learn all you can from all the master photographers but then turn all that knowledge into your own unique vision. See our post on photographing like Edward Weston and Ansel Adams.
To sum up a post of how to photograph like Michael Kenna we need 2 things. Beautiful simple composition and lots of shadows and highlights in a toned Black and White image.
Try it out. You might find that your own style, added to this technique creates some amazing images you’d never thought of doing before. Mostly, have fun doing it.
No Comments